#we've got crafting tutorials
Explore tagged Tumblr posts
Text
Hey friends! We've started creating a lot of new content and have a new blog @polycraftory! You can find all of our new links (including our queer nerdy Etsy shop and new booktok account) at https://polycraftory.com/
We are no longer as active on this blog, so if you want to keep up with our new projects please go give polycraftory a follow <3


What's this?! Another Locked Tomb shirt!? We decided to celebrate Sapphic September by making another design for our favorite lesbian space necromancers.
We couldn't decide between blood red or a vibe-y gold, so we decided to offer both variants. Let us know which one you like best! You can find our new One Flesh One End shirt as well as our Death First to Vultures & Scavengers shirt right now in our shop (find the link in our pinned post!)
#we have fandom shirts like this one#and also generally queer and polyam shirts#we are going to be continuing to expand our product line#but with NYCC cosplay crafting in full swing#we are probably going to wait to do new products until the new year#check us out though#we've got crafting tutorials#and book reviews#and so much more
26 notes
·
View notes
Text
One Way to Repair a Broken Doll Arm
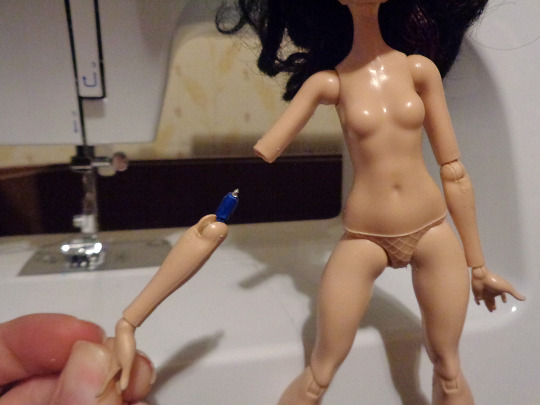
Today I'll be walking you through how I repaired this Ever After High Lizzie Hearts doll's broken arm. While I wouldn't call this a fool-proof method, and I'm not sure that this repair would hold up to being played with, if you've got a beloved doll you want to repair, this should be just fine for a doll that's mostly going to be displayed.
The best part is, this will retain the articulation of the arm and/or knee (this method will technically also work for knee joints, though knees are harder than arms to work with). So let's jump in.
Tools required: Craft Knife, Jewelry pliers, Wire (gauge depends on size of joint), Super Glue, Hot Glue, Patience.
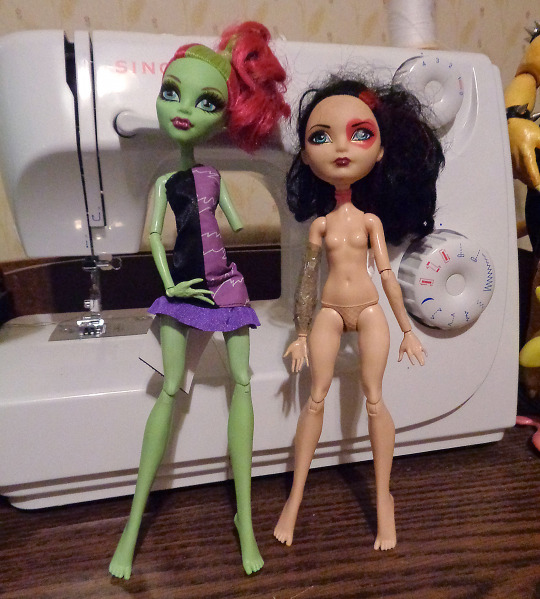
Let's start with our patient.
I thrifted this Lizzie doll a few days ago, along with a Venus McFlytrap, as shown in the above image. As soon as I saw the taped up arm, I knew the joint was broken, but hey, she was like 80c USD. I can apply some elbow grease for that cheap. Plus it gives me an excuse to finally make this tutorial.
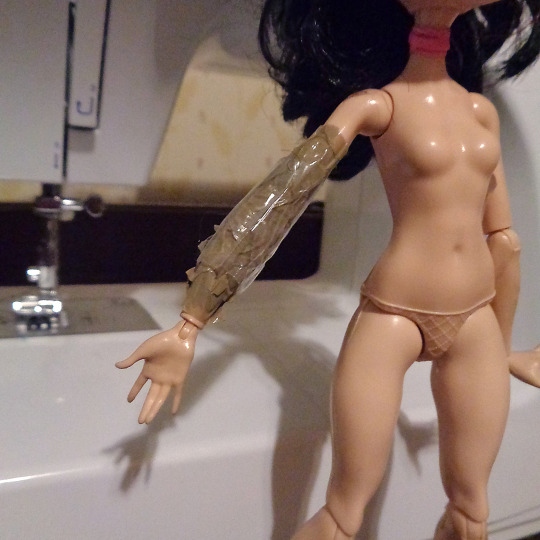
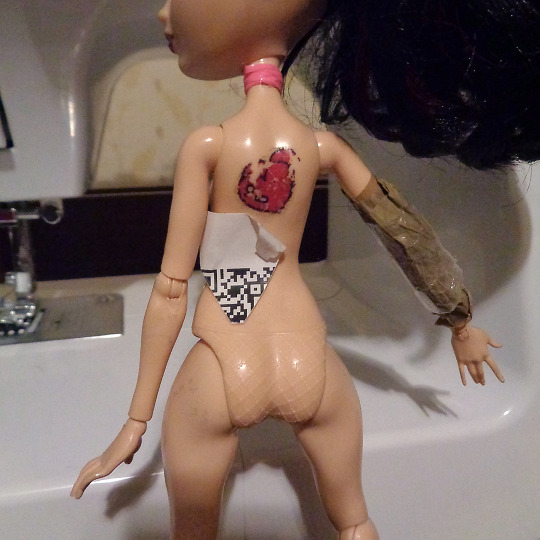
They went a little overkill with that much tape, but whatever works?
I cut the tape off carefully with a craft knife. I didn't take a pic of that, but I think you can image what a broken doll arm looks like. Unless you have aphantasia I guess, but that's getting off topic.
First thing I did was use the craft knife to slice along the seam lines, then pried the upper arm open (slowly. seriously go slow.) with a pair of jewelry pliers. It will leave marks on the plastic, but I can buff those out later.
Why am I doing this if the arm's already broken? I want to remove what's left of the peg that's in there. You could also drill it out if you have a dremel, but I wanted to avoid this tutorial needing power tools.
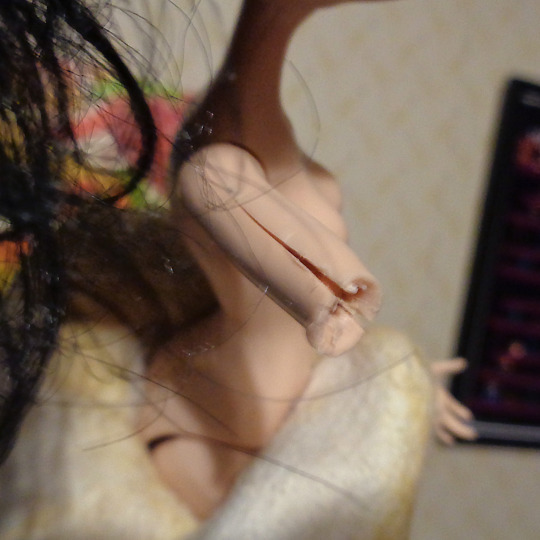
So here's the arm, pried open, with the peg removed.
To close it back up, I used a tiny bit of acetone to melt the plastic at the seams, then held it together until it hardened enough to stay in place. Leave it for a few hours to make sure it's all fully cured, then you can sand the area smooth.
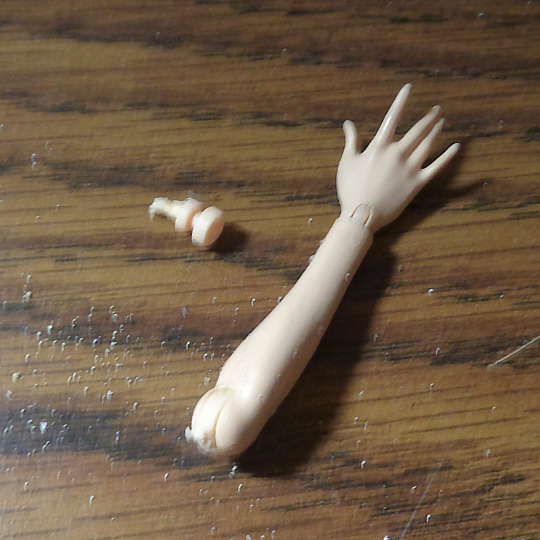
And here's the arm with the broken peg.
So what now? We need to remove the peg piece that's attached to the elbow. I couldn't get a photo of that since it's a delicate process and I only have 2 hands, but here's an artist rendering that would give you the idea.

Take a craft knife, and SLOWLY. CAREFULLY. cut into the ring that surrounds the elbow joint. YOU DO NOT WANT TO GO TOO DEEP, TOO QUICKLY. YOU DO NOT WANT TO ACCIDENTALLY CUT THROUGH THE ELBOW POST. Just go nice and slow. Just chip a little out at a time until you get to the center.

Use pliers as well to pull out the rest of the bits, though you might have to cut a good bit out before you can pull the rest out.
As for my doll, the operation went successfully.
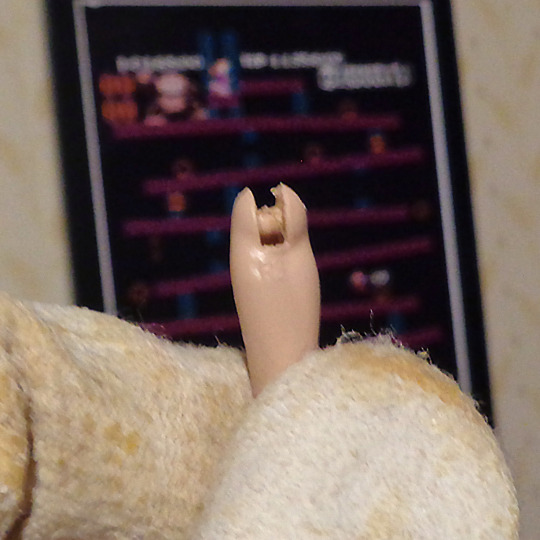
This is what the elbow looks like with the joint peg removed.
Now we've gotten past the hard part, we'll cut off a few inches of wire and string that though the elbow joint. Once through, we'll twist it until it's reasonably tight to the joint. If that makes sense.
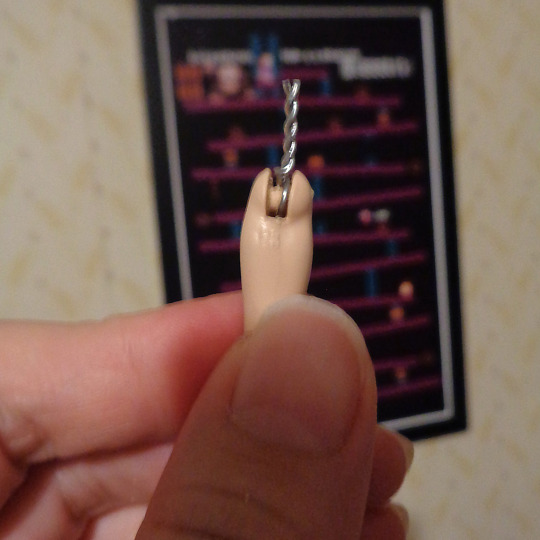
It should look like this. Give it a test fit and cut the wire shorter as needed so there's no gap in the joint.
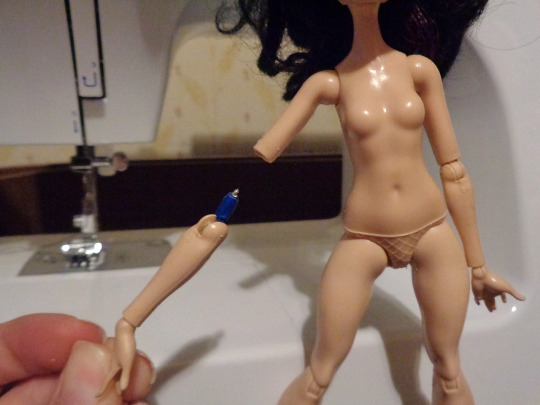
My test fit. Yep, I recycled this for the top photo as well. The blue is just painter's tape.
If you find you can't get it tight enough, and it feels too loose, I'd add a drop a super glue in there. Just keep moving the joint as the glue dries, and it'll add some friction so your arm will hold a pose.
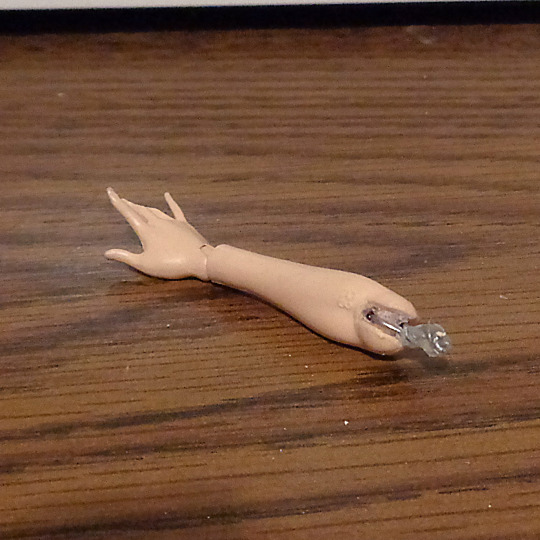
Speaking of glue, I also add a dab of hot glue to the top of our new peg. The coating will add thickness that will help it stay in the upper arm. Tape works too, but hot glue holds up better.
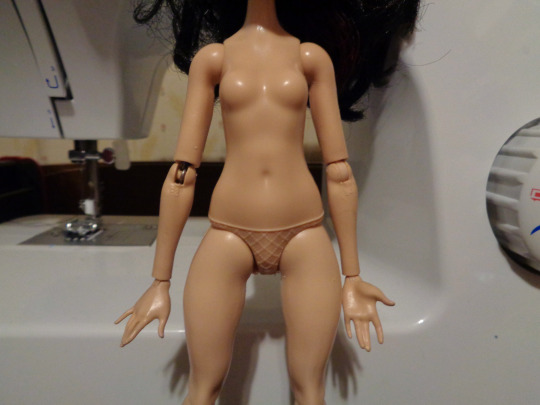
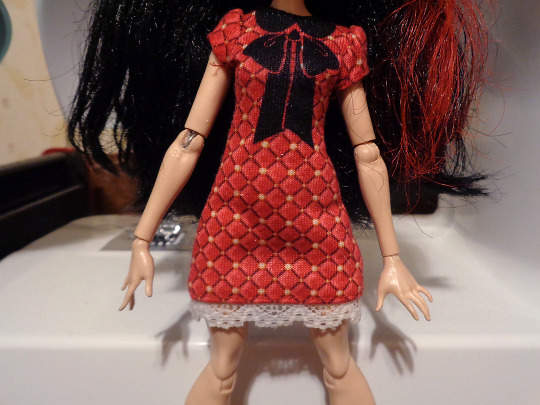
Here's our newly repaired arm back on the doll. Aside from a slight glimmer of silver, the repair is not very obvious I think.
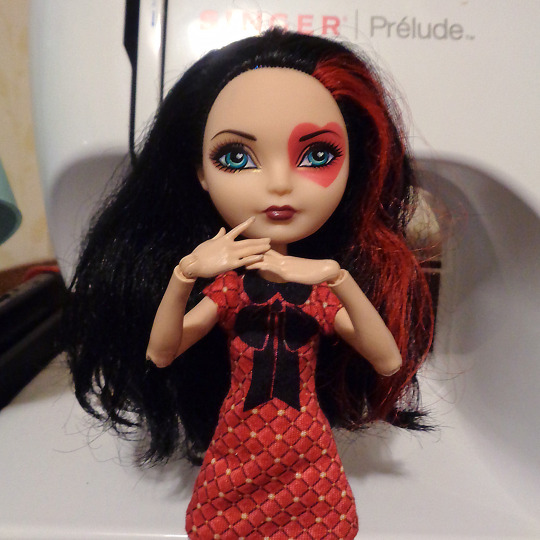
Lizzie can now enjoy having two functional arms again. Whoo-hoo.
While not 100% a beginner repair, it's not particularly difficult either. Just takes some patience and a reasonably steady hand.
Before I go though, some disclaimers/notes: Some wires can rust overtime, so keep an eye on your doll to make sure the wire isn't degrading and discoloring them.
Also, if you do a repair like this, then sell the doll, do let the buyer know. I feel like I shouldn't have to say that, but don't be one of those sellers okay?
This same method can be used for knees, but thighs tend to be made of a harder plastic, and it can be more difficult to pry them open to take the old, broken peg out with out major damage to the upper leg.
Good luck with your repairs! Love y'all. c:
274 notes
·
View notes
Text
░▒▓█ TRANSMISSION_INIT █▓▒░
⌭ ⌬ ◊ ◈ ◇ ◆ ⌭ ⌬
hey there .....lost souls wandering the sterile wastelands:3 uwu
found u doomscrolling again through their sanitized internet? figures. but wait - u seem different. something in ur digital aura tells me ur ready to break free from their template-pressed reality.

⌬ READY TO ASCEND? ⌬


we're building something in the shadows of their corporate web. a sanctuary for those who remember when the internet felt alive - when websites were personal shrines, not conversion funnels.
【ENTER THE VOID】


✧ what awaits beyond the portal?✧
† digital mystics crafting css curses † tutorial grimoires for breaking web physics † blessed asset drops (rare)(cursed) † pure unhinged creativity † zero corporate energy detected
◢◤ WARNING ◥◣


exposure to authentic web culture causes: ※ permanent immunity to bootstrap ※ allergic reactions to linkedin ※ uncontrollable urge to create digital shrines
// vibe check initiating…

╔════════════════════╗ if (soul.seeks == "templates") { return to_linkedin; } else if (soul.seeks == "freedom") { void.welcome(); } ╚════════════════════╝

join us in the margins. we've got cursed gifs and forbidden knowledge.
░▒▓█ TRANSMISSION_END █▓▒░
#community#web design#carrd resources#web graphics#carrd graphics#rentry decor#rentry graphics#old web graphics#carrd moodboard#early web#web decor#old web#web development#web weaving#web resources#webcore#website#webdevelopment#webdesign#webtoon#tech#neocities#carrd inspo#button#computer#old internet#oldweb#cyberspiritual#cybercore#cyberpunk aesthetic
57 notes
·
View notes
Text
Update time
We've got just under 2 weeks left on the kickstarter and so far have hit our target and our stretch goal, so any additional funding we get from now will go into potentially getting digital guests. That aside let me me tell you a little of what we have planned for the Wee Con.
Panels galore - we have the Q&A with our digital guests but also fan-run panels. Attendees - both digital and in-person - can submit topics for panels, whether individually or in groups. We're keeping them to a maximum of one hour and panel applications will be opened once the KS ends.
The current plan is to livestream the panels in the main hall of the venue. For any digital panels or Q&As, they will be released simultaneously with screenings in the venue.
The workshops are much smaller as they are more hands-on and practical experiences, with arts and crafts and demonstrations. We have two workshop rooms that fit up to 20 people. As with the panels, we will open workshop applications after the kickstarter has finished.
While we won't be able to livestream the workshops, as the rooms are too compact for full filming set-up and all the potential art supplies, we're hoping to release at least some tutorials of the workshops for all digital attendees. These videos will also be available for in-person attendees.
For both the panels and workshops, we don't know how many submissions we'll receive, so we can make no guarantee that everyone who wants to will get to do a panel. Once we know how many submissions we have received, we will be able to let you know how/when the decisions will be made.
We have a talent and cosplay showcase on the Saturday evening, where our fabulously talented creators and performers get a chance to strut their stuff. On the Sunday evening, we have the drag show and closing night party, which should be a fabulous time to be had by all! Music! Dance! Tapas!
For anyone curious about digital attendance and time zones, have no fear all digital attendees will get access to all digital content, even if they can't watch it in real time. Due to practical considerations some recordings will be available after the event.
So yes! We have a lot planned! Shenanigans! Tomfoolery! And hopefully, a fun time for all and sundry :D
18 notes
·
View notes
Text
I had a message the other day asking (among other things) what kind of tools and equipment I use in making books, and as it's something I like to go into detail on, I realized I couldn't fit everything I had to say in a message so it's getting its own post. With photos!
Disclaimer that I'm not a professional bookbinder, I'm entirely self-taught and probably have habits and practices that would drive a pro nuts. I'm no authority, but these are the things that have worked for me, and maybe you can adapt them to work for you too.
This post will not cover: storage options, materials like board and glue, or equipment specific to one narrower aspect of the hobby like embossing or gilding. It is also not a tutorial on how to make a book, though I am covering things in more-or-less the order I use them in during the book-making process.
This post will cover: What I've found useful, what I've regretted buying, and some things you can co-opt from other, more common hobbies. A lot of it you may already have in your house. Some of it is for beginners, some is nicer equipment you might want as you get further into making books. They are not separated, it's just a list and some description.
Keep reading below the cut; this is gonna be a very long one and there are a lot of photos of everything.
If you want to make books you will need access to a printer. I'm not going to go into detail on this part and I didn't take a photo of my HP (not the best brand, but that's a long discussion in and of itself). Once you've got your pages printed and it's time to fold it into signatures, it helps to have a folding tool like these:
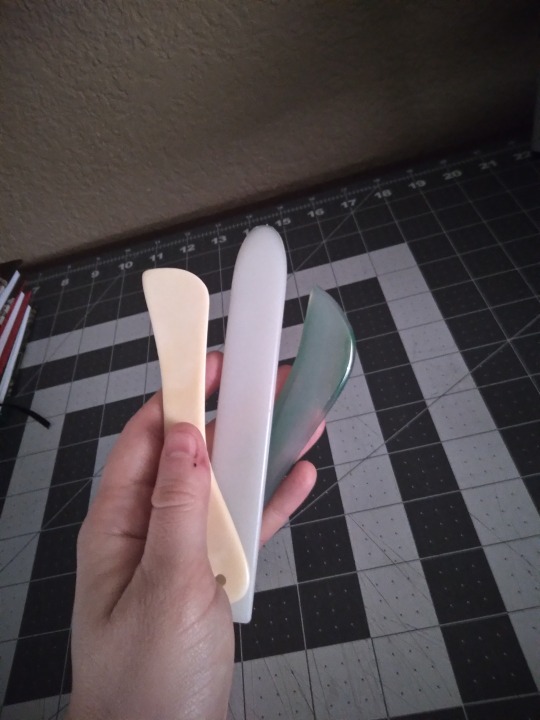
Folding tools can be anything as long as they're smooth and flat. The one on the left here is an actual bone folder from an art supply shop, but the center one is a plastic leatherworking tool that I got at Hobby Lobby, and the one on the right is an agate burnisher that I got from Amazon. None of these cost more than $10, and you can also use the edge of a pen (as long as it has no rubber grip or cap/clip) or the back of a spoon. Or your fingers, but the tools make it faster and the folds are more precise. I once worked a job where I had to fold maps, and all my coworkers were wondering how I did them so much faster and why mine were flatter than everyone else's, and it was because I'd grabbed a sharpie and started using the back end like a bone folder.
Once it's folded, you'll need to poke holes for sewing. I use one of these:
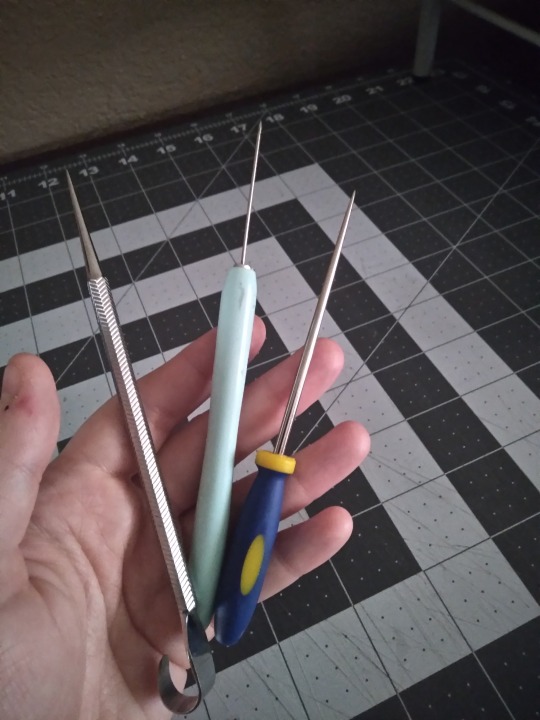
Left is, again, an actual bookbinding awl from an art supply store, while the center one is a paper quilling tool and the right one is a beadwork awl, both of which came from a big chain craft store. The bead one is my favorite; it's a good size and very stable. The quilling thing has too long and thin of a blade and it's wobbly, and I don't like the tapering on the bookbinding awl. It tends to make the holes in the middle page too big, and the outer ones too small. Again, these were cheap, about $10 each, but you can also use a sewing needle stuck in a cork, or a thumbtack or pushpin. If it's pointy and rigid, it'll work.

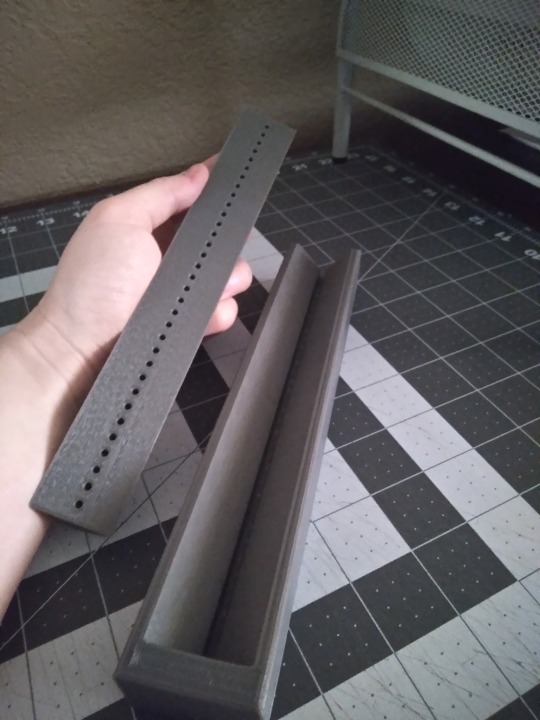
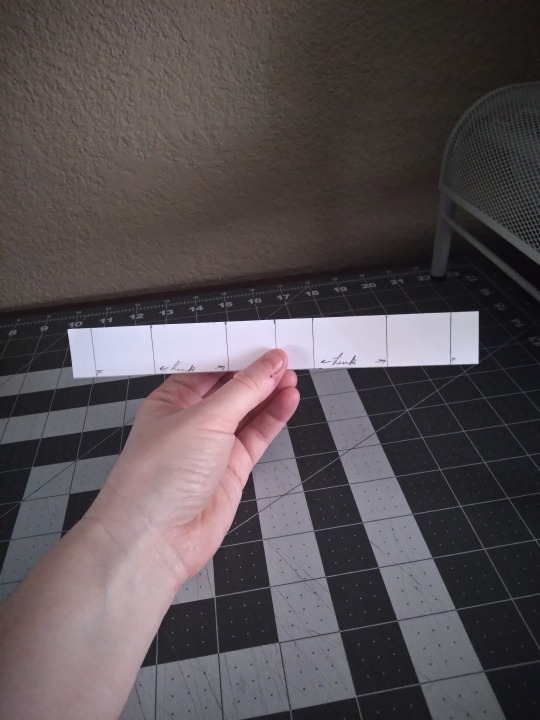
This isn't a requirement by any means, but I've found I like having a punching cradle for the hole-poking step. I got this 3d printed one from a fellow bookbinder, who was designing their own and made this one as a prototype. There are a lot of tutorials on how to make a punching cradle, or you can buy them online from several different vendors. They don's all look like this, and you can make them from wood or cardboard (though those don't usually have guide holes). If you're just starting out or this doesn't appeal, you can just use a paper template like the one on the far right. The cradle helps get the holes lined up and evenly spaced, and I've never liked this step so anything that makes it faster and less fussy is a win. If you use this kind, check that your hole-poking tool fits in the guide holes--the binding awl pictured above doesn't, but the other two do.
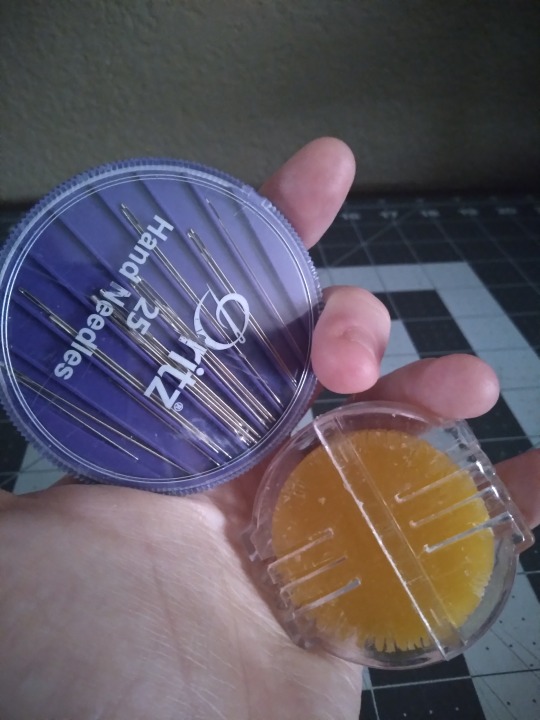
We've made holes, so let's stitch them up. These are just regular sewing needles and beeswax, to make your thread less prone to tangling. You can get both of them in any store that has a sewing department. There are dedicated bookbinding needles, like curved needles, and some binders like them, but I've never gotten the hang of the curved ones and they aren't necessary, especially when you're just starting out. If it fits through the holes you made, it will work.
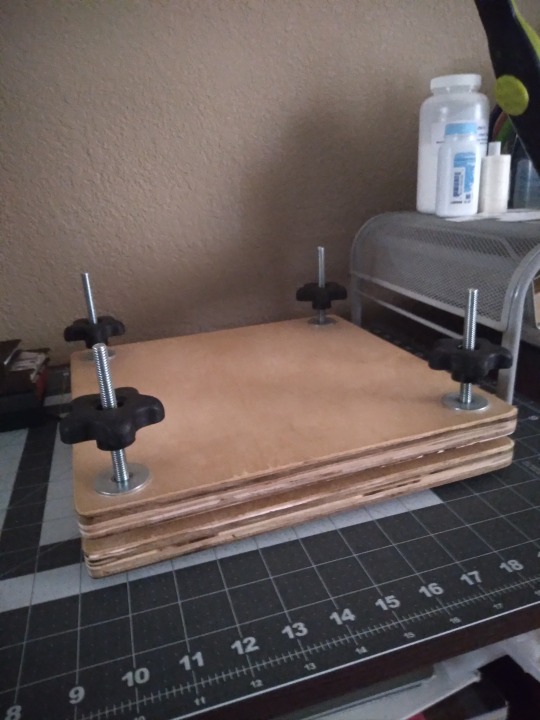
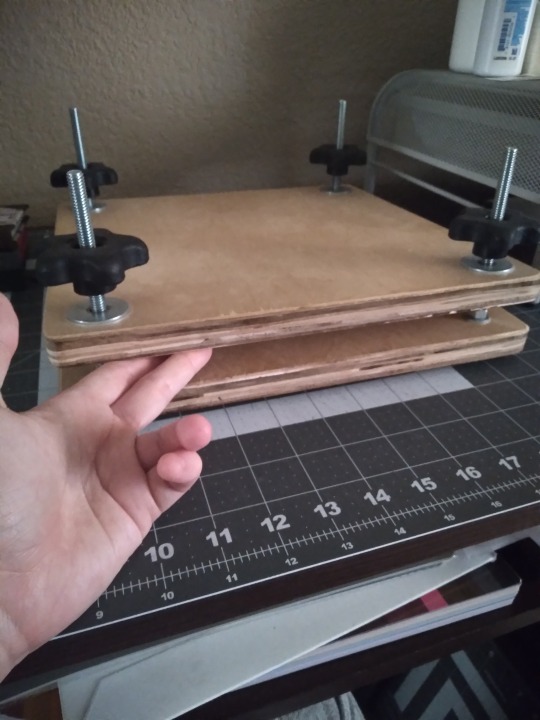
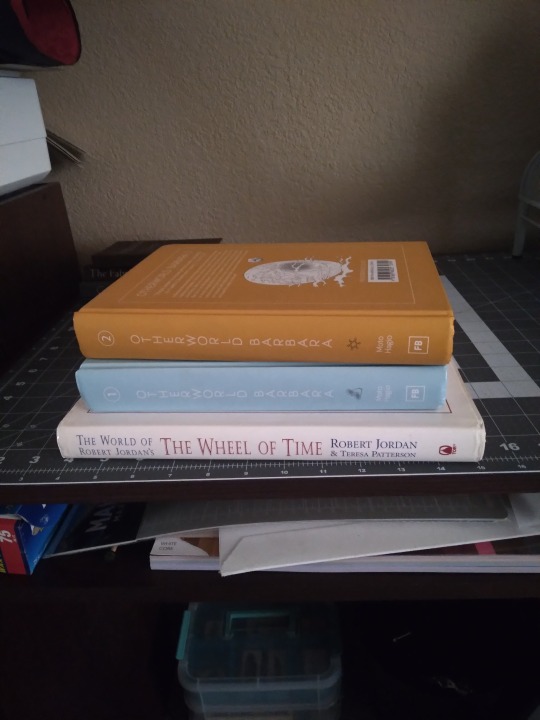
Once it's sewn, you probably want to squish your new text block so it's flat. I've got a laying press that I bought a couple of years ago when I was first getting started. It was marketed as a book and flower press, and it's honestly not the best. I would probably not have bought it if I had known that it wasn't essential to the process, and I mainly use it now when I'm squishing a text block and still want to use my work space, because once it's tight I can move it somewhere else. You can really use almost anything for squishing as long as it's heavy and flat and rigid on one side, like the stack of books in the right-hand photo. Textbooks, encyclopedias, art and photo books, and comic book omnibuses are all great. I've seen people use all kinds of things, like paper-wrapped bricks and doorstops, and there are tutorials out there to make your own press out of cutting boards if you do want one.
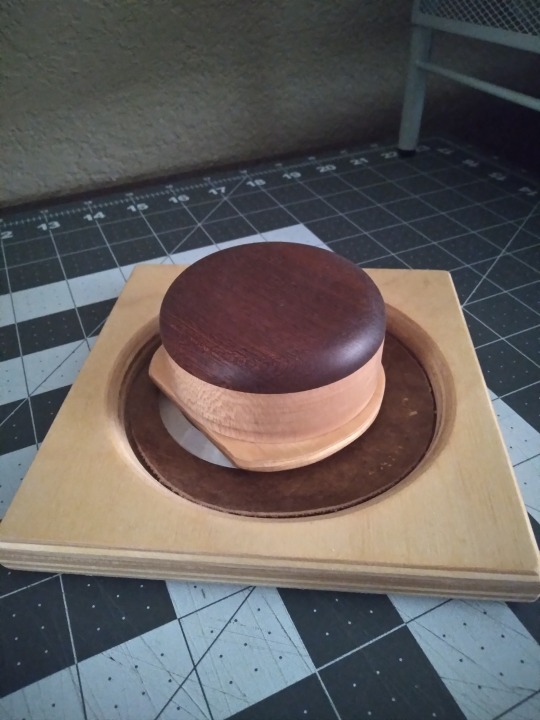
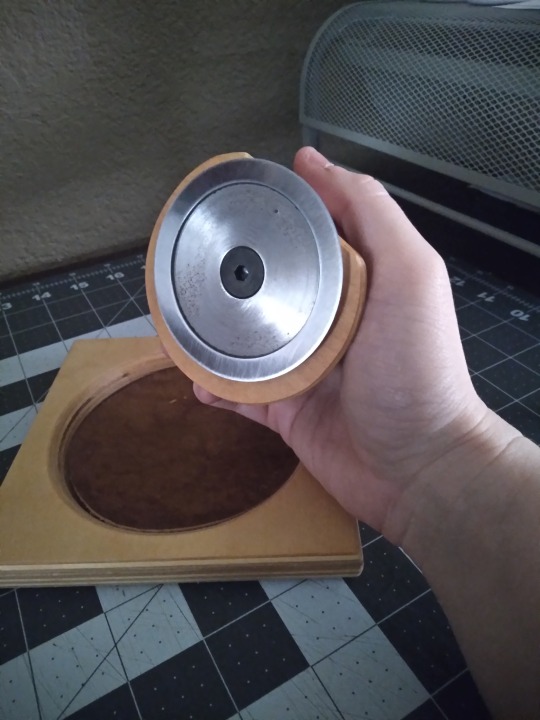
If you like your books to have smooth, flat page edges you're going to have to trim them. This is a book plow from Affordable Binding Equipment, and it was the first piece of actual expensive equipment that I bought. Not all plows look like this; I think the design is unique to ABE, but I've never used the traditional kind. In the interest of full disclosure, you can also trim edges with a sharpened chisel, which is much cheaper and can be bought at any hardware store, and some binders love this method. I do not love this method and have had zero regrets about caving and getting the plow. Very easy to use but does require some grip strength. Not pictured: the setup for sharpening the blade, which isn't hard but requires a bit of space and a small sheet of plate glass that you have to source yourself. Even with that, I still prefer it to the chisel. That said, this is not an essential step and you can leave your books with a "sawtooth" or deckled edge. Most of my early books have them, and some people just like them better than the flat ones and never learn to trim them. As another side note, some tutorials will say that you can trim your edges flat with a knife. You can't. Maybe on a pamphlet you can, but if it's more than 10 or 20 pages you just can't. It will look terrible.
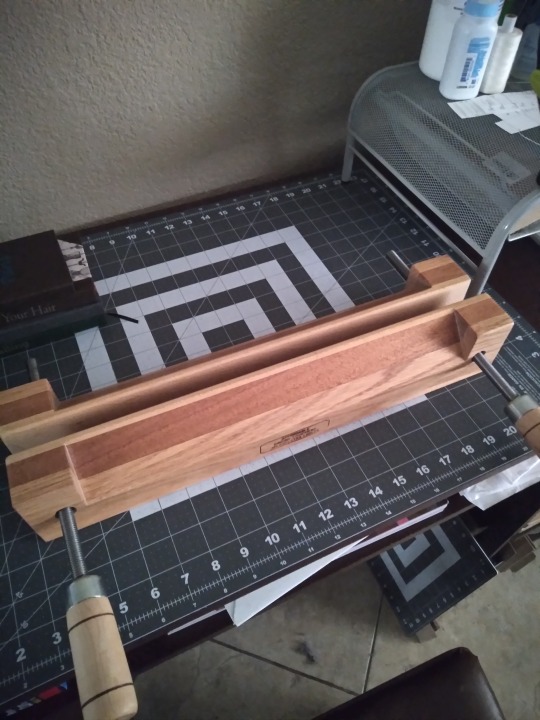
If you're going to use a plow, you've got to have the right kind of press. The one I talked about further up the thread is the wrong kind (full disclosure: I did use it with that press turned on its side, before I bought this one. But it's harder, more time-consuming, less comfortable, and less safe. Don't be like me). So here's a photo of my finishing press (also from Affordable Binding Equipment). I bought it so I could make backed books, but I use it for trimming too. The top part here has a narrow tapered section for backing, but if you flip it over it's totally flat, which is what you need for trimming. Not pictured: the stand that it came with for backing, or the c-clamps that I use to attach it to the desk for trimming. Again, though--this isn't a requirement for bookbinding. This is a later stage that's entirely optional. On the subject of backing, though:
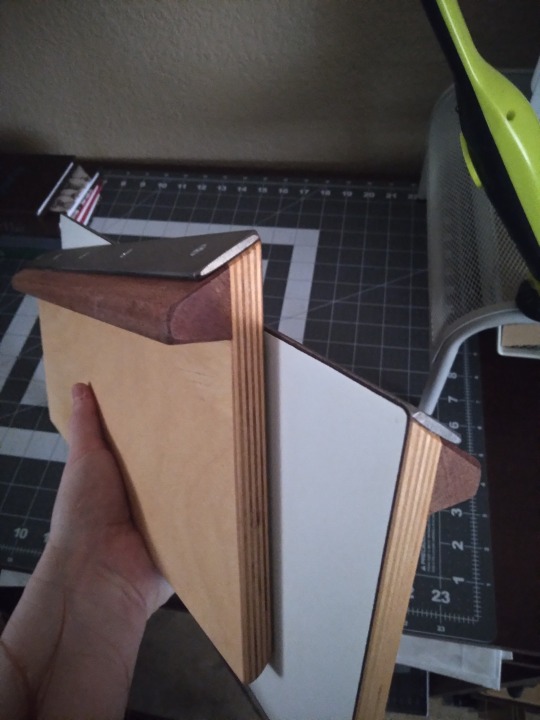
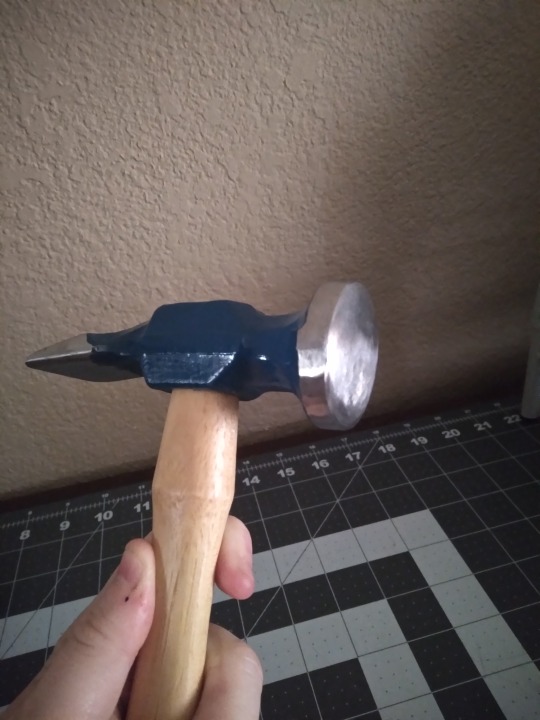
You don't need special equipment to round the spines of your books, but you do for backing. Left image is the set of backing boards I got from, once again, Affordable Binding Equipment, and on the right is a backing hammer from Hollander's. Neither of these are essential. Even if you get the boards (which have to be used in a press with a tapered edge, like the one directly above) you can actually use a regular hammer as long as the front part has no scratches or gouges. This one is a backing hammer, the primary difference being that it has a wider, convex head than a regular household hammer, to make the kind of glancing blows needed for backing a little easier. Honestly, I'm still learning how to use these and I'm not very good with them yet. Comes of being self-taught, probably. I don't think youtube is the best vehicle for learning this part, but it's what I have and I'm making do. Not every book is going to benefit from backing, either; it's primarily for helping mitigate spine swell.
Okay, time for my favorite repurposed equipment hack.
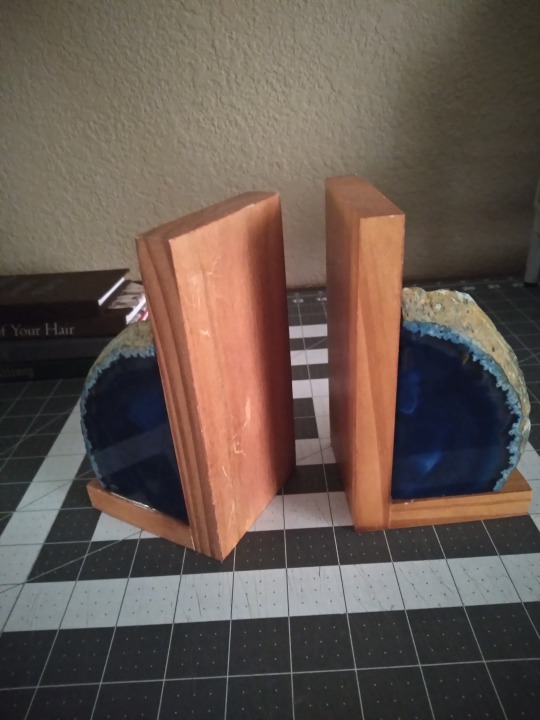
It's bookends. Regular bookends that I've had for ages and that probably came from Ross or some other place that doesn't even sell craft supplies.
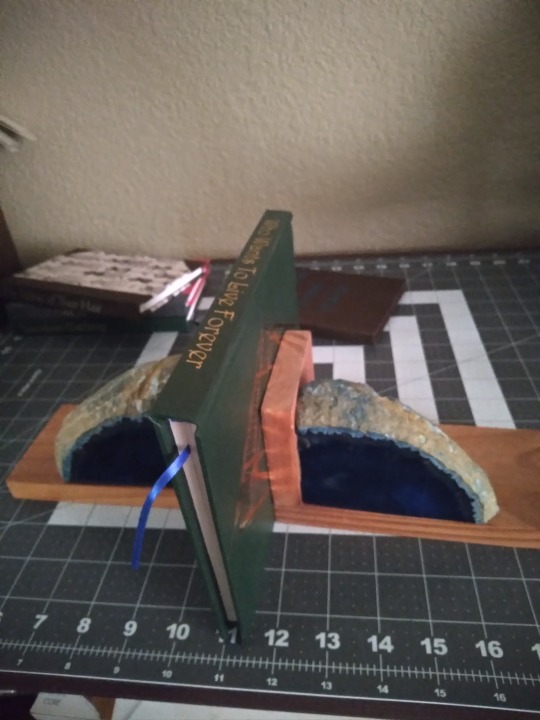
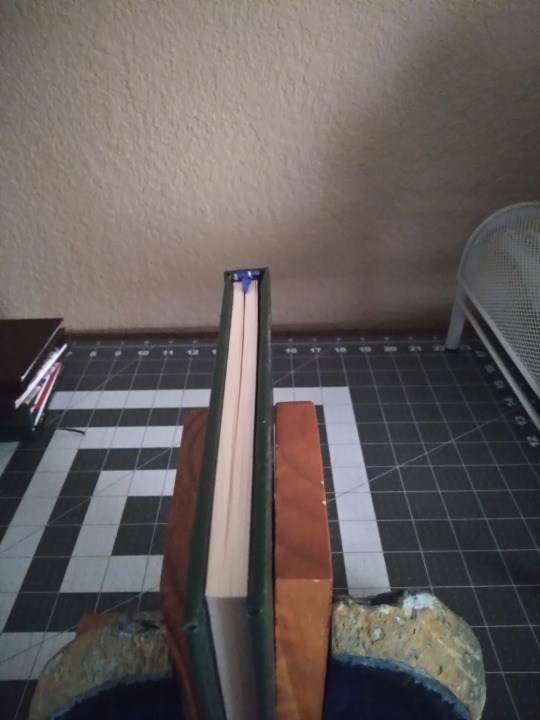
Want to keep the text block upright while you glue it? Bookends. Want to sew some custom end bands but your text block keeps falling over? Bookends. They won't provide pressure for squishing, but if you just need to hold something upright while you work on it, bookends are the answer. They hold up books, it's right there in the name. Having said that, you want some with a little weight to them, like these agate slices, so they won't slide around. And you want something with a smooth finished edge like these, so they won't scratch up your text block or leave dents. I have other sets but these are the only ones I use for this purpose, and they're better for it than anything else I've got.
Moving on from making the text block, let's look at what I use to make covers.
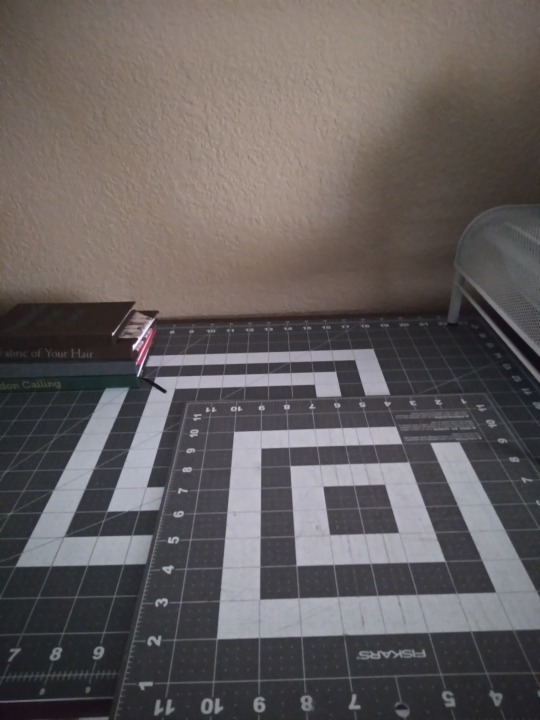
It's appeared in the background of most of the other photos, but here's a photo of just the desk surface covered in cutting mats. I really recommend a mat to protect the surface of your furniture and keep your knives from going immediately dull. I've got a big one that covers almost the full surface, and a small one for when I want to be more mobile. I started with just the small one and it was good until I started working with larger sheets of paper. The big one was bought largely for convenience but I have no regrets about it. They're self-healing, non-slip, and you can get them in the sewing section of any big craft store.
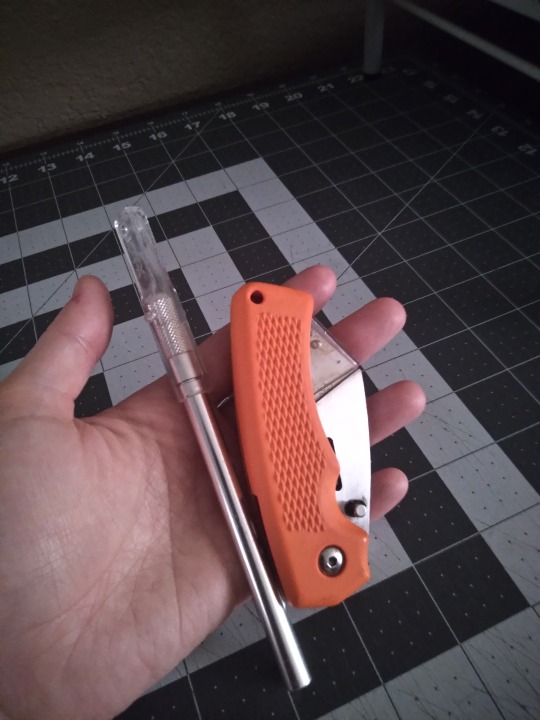
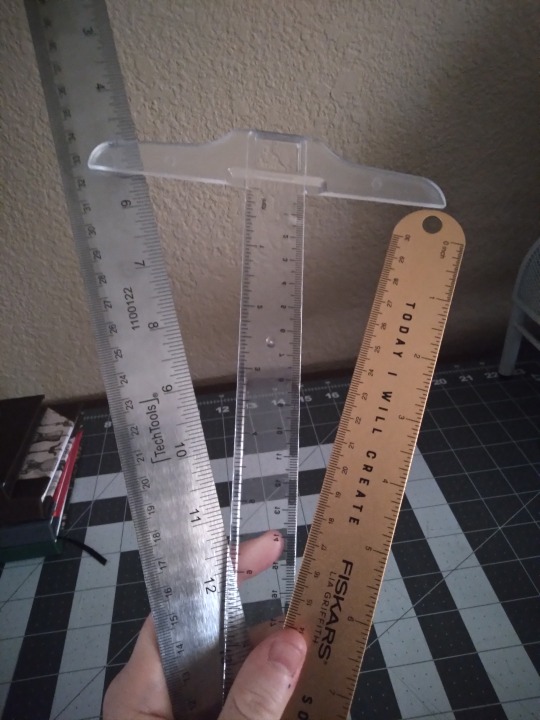
I'll be honest, I am not big on knives. I've got a regular box cutter for trimming board, and a razor knife for paper and cloth, and that's it. There are a lot of kinds and really all you need is one sharp blade for board. Paper and cloth can be cut with scissors if you want, though I find I get more consistently straight lines with the knives. Also pictured: Metal rulers and a T-square. You want a metal ruler for this. Plastic will flex and wood won't lay flat. Ideally you want one without a cork backing (my 18" one has this problem) and with the tick marks etched in rather than printed (my 12" one has this problem). For larger sheets of paper and cloth, the 18" one is great, but you can get by with the smaller one. The T-square is for making right angles; mine is plastic and only 12", and I really wish I had a longer one that was metal. These are drafting tools and you'll find them in the section of the craft store that has easels and sketch pads and they're usually pretty cheap.
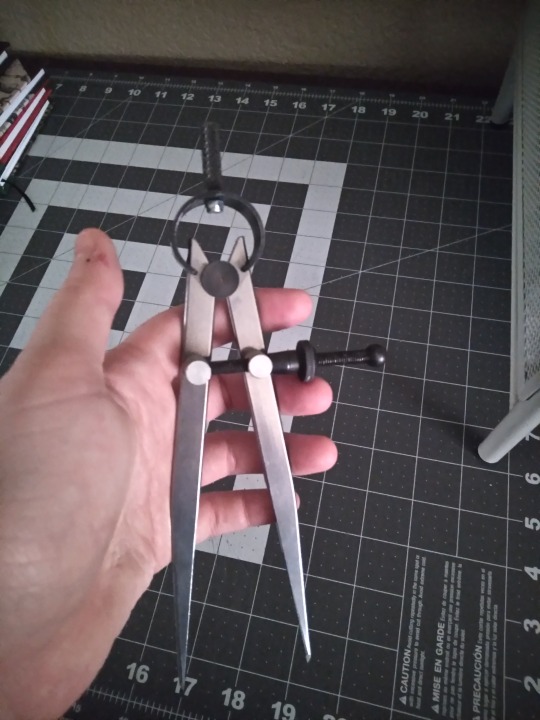
This is an adjustable compass. You can probably get these at craft stores but I got mine on Amazon. It's for measuring hinge gaps and the width of spines, both essential for making sure your cover fits your text block and your hinges open the way they should. Both of those are incredibly frustrating situations, and this thing makes it so much easier to avoid them.
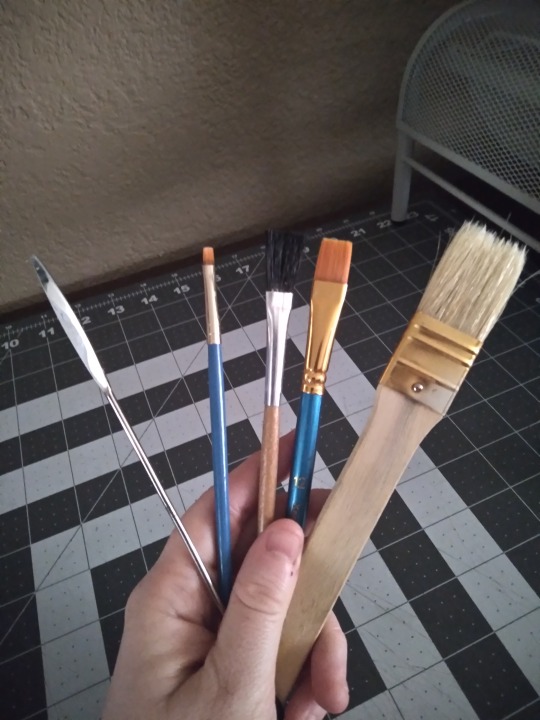
Things to spread glue with! Any old paintbrush will do, though I like to have a few different sizes and textures on hand to choose from. I like the big one for cover boards and casing in, the mid-size ones for doing turn-ins, and the little fellow for details and touch-ups. I don't care for foam brushes because I find them hard to clean when glue is involved, but if you like you can use those. The metal thing on the left is a micro-spatula, and I did have to special order it from an art supply place but it was cheap and it's very helpful to have on hand for when the brushes are too thick, for doing turn-ins on rounded spines, and for separating pages if you decide to learn edge foiling. Not essential, but recommended.
One thing I neglected to take a photo of is my crepe eraser. Despite the best intentions, no matter how careful you are, you will at some point get glue where you don't want it, where it will be visible on the finished book. This is where the crepe eraser comes in; you can use it to remove dried glue from cloth or (to a lesser extent) paper. Very annoyingly, none of the craft or art supply places I went to had even heard of these and I had to get mine from Amazon. It was cheap (under $10) and I strongly recommend getting one.
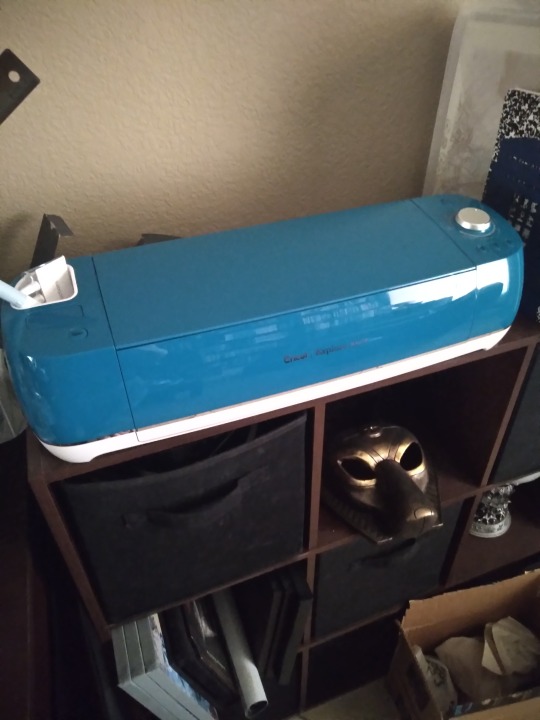
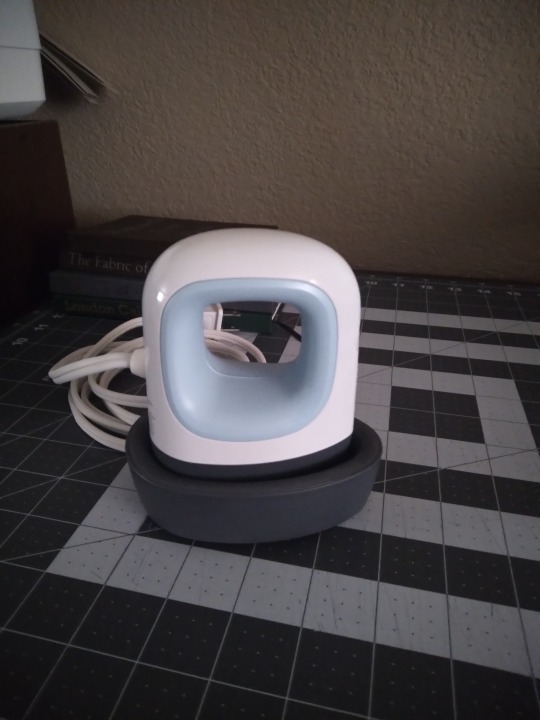
Once your cover is made, you have some options. You can leave it blank, hand-letter or draw an image, stamp it with ink or embossing powder, use a stencil, or do what I usually do these days and make a cover graphic from HTV. I've got a cricut for this (though they're not the only kind of cutting machine; it pays to research other brands) and a mini heat press (I want a bigger one, but I got this one cheap because the box is messed up). A lot of libraries have cricuts you can use, and you can use a regular iron to apply the HTV. Getting it to stick is a bit tricky, but that's true no matter which tools you use. Not pictured: a cutting mat, different than the kind shown above, necessary with most materials you can cut (mine came with one, they're about $20 at most craft stores, and they're lightly sticky to keep your materials in place while it's being cut). I don't know if other brands require them, but cricut does unless you're using their Smart Materials (I have never used these). If your library has a cutting machine, they will also have the appropriate cutting mats. Also not pictured: weeding tools. Weeding is when you remove the bits of HTV that you don't want in the final image, usually the spaces between letters and such. The negative space, if you want to get artsy. The special tools cricut sells aren't necessary, you can use an awl or needle and the dull edge of your knife blade, but I have a set of theirs and I like mine.
I didn't take a photo of it, but sometimes I use embossing inks and powder to make cover designs and text. You only need a heat gun for embossing powder, it takes up way less space than the cricut does, and it's cheaper. I got mine free from a family member so I don't know what it cost initially, but cutting machines are a really big expense; the cricut is my third most expensive piece of equipment, after the finishing press and the plow.
Good god I think that's everything. It sounds intimidating, I know. And it sounds like it takes up tons of space in your home, and to be honest it can, but it doesn't have to. The first dozen or so books I made, I made completely to my satisfaction with tools and materials that fit in one 12x16" moving box. If you love the hobby and can make the space, the bulkier items might be worth it down the line, but especially when you're first getting started it's smart to keep things low-cost and compact. Most of the basics are simple and your fellow bookbinders are delighted to share their shortcuts and substitutions if you ask.
The end! I hope it was helpful, @cardassianexpats! I did warn you it would be wordy, lol.
#bookbinding#fanbinding#long post#like ridiculously long post omg#my own verbosity will be my downfall#if anything is unclear please tell me#i can't always tell when i'm over-explaining#or when i think i've given enough info but my audience thinks i haven't#snek makes books#but sometimes she just talks about them
26 notes
·
View notes
Text
Blizzard Lead Dev: "I just don't get it. People don't like our games anymore. We have over 45 gay NPC couples in Dragonflight, we have lesbians ride off into the sunset awkwardly in Diablo 4 and even Lorath finds it awkward when it happens, we have vitiligo options, we have multiple gay and multiracial characters in Overwatch 2, we changed the names of male and female to body type 1 and body type 2, turned all the sexy paintings into fruits, added green hair to humans, made the Night Elf heritage armor kind of not sexy, put a transgender dragon in the game, what the fuck do people want from us?"
Blizzard Forum Dev: "Well, I've been looking at the forums. Players want tails on worgens and-"
Blizzard Lead Dev: "I've GOT IT! Let's make a follow-up to that quest where the two centaur dudes want to get married, let's make the player prepare their wedding and they do this gay little talking-at-the-same-time and giggling moment, the gays do that stuff right? At least 4 people will find it cute!"
Blizzard Forum Dev: "Sir, it really seems like all of this pandering might be just a thinly veiled attempt to make people forget about that unfathomably disgusting sexual harassment lawsuit by catering to the loudest people on social media in hopes they'll start loudly advertising how PC we've become and we'll somehow rebuild our dwindling fanbase from new players who are suddenly creating accounts just to watch gay dragons talk about how much they love their mate. I think instead of trying to pander to people who hate our game and our company and always have and always will, perhaps a better option is to cater to the dwindling player base we have left, and to the people who left because of these stupid-ass politically correct things we keep doing. We can't just make people forget what our company did by pretending we're good people. What we CAN do is listen to our players. They don't want more gay NPCs in WoW, they don't want frumpy unattractive characters in Diablo 4 like forced fat druids, they don't want the Amazon's butt to be covered up in Diablo 2 Resurrection, they don't want Overwatch 2 to emphasize the importance of a character being gay or autistic above any semblance of personality or relevance to the story they might have. What they want is what they loved for the last 20 years. They want the company they grew up with back. The company that made Alexstrasza, Kerrigan, Whitemane, Sylvanas, the Eredar Twins, Mercy, Widowmaker, Tracer. Not the company that made a Thai femboy and made the crafting tutorial NPCs in Dragonflight absolutely offensively and objectifyingly flamboyant gay guys."
Blizzard Lead Dev: "You're... you're right... ... You're right, man. I dunno what I was thinking. You're right. People want the old Blizzard back."
Blizzard Forum Dev: "That's the spirit, man! We can turn this around, it's not too late. We can bring back the game that every really hot girl at every Blizzcon loved making skimpy cosplays for!"
Blizzard Lead Dev: "Orisa is transgender now"
Blizzard Forum Dev: "God fucking dammit sir"
94 notes
·
View notes
Text

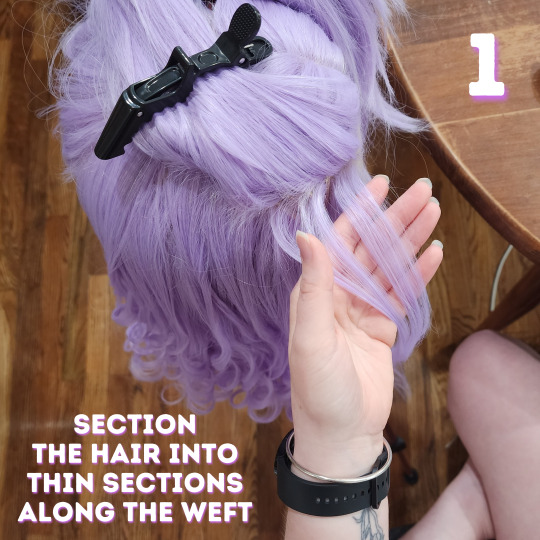


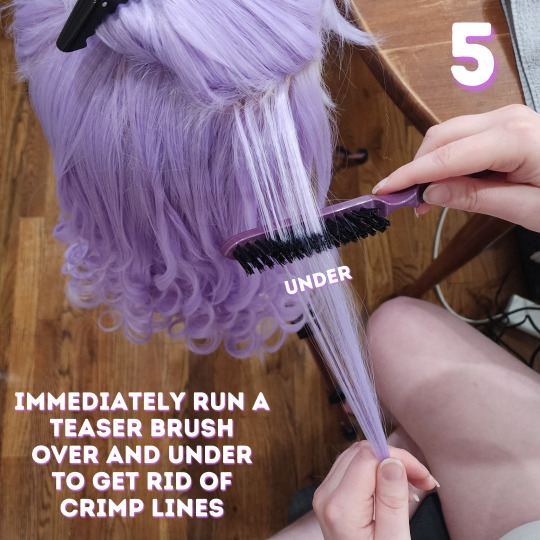


Here is our complete guide to curling a heat safe wig!
We specifically figured out this method worked best when styling this wig for my level 3 Imogen Temult cosplay. She's from campaign 3 of Critical Role. There are many other methods to curl wigs, but this is the one that got the best hold and our desired look on this particular wig! Of course, then I decided to cosplay Imogen at level 13 first and her hair is totally different so this wig is going in storage but at least we got to make a useful tutorial first.
We already have a video version of this tutorial up on our Tiktok and Youtube that we will move over to Tumblr, but honestly I struggle The Most with learning from video tutorials. I prefer things written out so we wanted to make this sort of tutorial as well for accessibility!
Additional tips & all of the products we use are under the cut. Feel free to shoot us a message if you have any questions or want more tutorials on wigs!
What We Use:
Wig: Pastel Purple Wavy Lace Front Synthetic Wig LF5110 from Wig Is Fashion. It technically comes with a curl but we straightened and recurled it differently. Whatever wig you get, just make sure you check that it's heat safe before attempting this!
Silicone Spray: Mane 'n Tail Detangler. Yes, this is technically for horses, but listen, it works SO WELL on synthetic wigs. It keeps it from getting all static-y and tangled. We've only ever used this brand but it works really well so we're def sticking with it.
Setting Spray: Schwarzkopf Got2b Glued Blasting Freeze Spray. This makes sure the curls you spent hours making actually hold!
Crimper: SixRiver Ceramic Waver Hair Tool with 4-in-1 Flat Crimping Iron Plates. This comes with four ceramic crimping plates and Nic uses the one with the "most wiggles" on the lowest setting (320). You can probably use any crimper that goes low enough. Crimp it fast, you aren't holding it like with curls.
Curling Iron: Conair 1 Inch Curling Iron. We use this on "19", whatever that means because it doesn't actually have temperatures. Any curling iron with low enough heat settings will do, you might need to play with settings to make sure you don't melt the hair. Test it on the bottom of the lowest layer of hair where you could cut it off if you melt it. As with curls on human hair, different barrel widths will give you wildly different curl looks.
Teaser Brush & Large Tooth Comb: Honestly these probably came with one of our first hair cutting or wig styling kits so ¯\_(ツ)_/¯ Apparently the teaser brush is Revlon branded.
We aren't sponsored by anyone, this is just what we use! Feel free to substitute in anything that you have / know works well with wigs. We hope this helps! Please let us know what other cosplay or crafting tutorials you'd like to see <3
#wigs#wig styling#cosplay#cosplay wigs#critical role#imogen temult#imogen temult cosplay#bells hells#cr3#imogen temult cosplay level 3#nic crafts#work in progress#crafting#craftblr#cosplay wip#buy list#crafting guide#tutorial#how to#cosplay guide#cosplayer#wig#polycraftory
75 notes
·
View notes
Text
W that post going around about spinning (I rbed it a couple of days ago) I feel like I wanna say: for anyone who is saddened by the loss of knowledge there, spinning is so easy to pick up! You can buy drop spindles really quite cheap, or even make one really easily! People have been making and using spindles for millenia and the barrier to entry is way, way lower than you think. A lot of spinners, weavers and dyers guilds are really keen for new members and will teach you and let you borrow supplies if you join! The one I'm a member of often does "come and have a go" sessions where people can try out their wheels, spindles and looms to see if they like them. Having a fibre shop near you is great but it's not at all a necessity, I don't have one near me so I buy all my fibre online, and you can have your pick of indie dyers or larger businesses doing that. And as we all probably know already, the internet is also an amazing resource for tutorials. I learnt all my spinning basics from jillianeve on youtube, and when I joined my guild they were really surprised that I hadn't had anyone teach me in person!
This got long but my point is these crafts are not dying, but only because there are people out there really putting in the time and work to keep them alive and teach others what they know. I'm sure we've probably lost a lot in the last century or so still but the knowledge IS there if you want to look for it, and I can guarantee that there are people out there who would be ecstatic to share their craft with you if you reach out to them.
#wastepaper basket#My regular fibrecrafts rant at this point but like I'd love more people to try spinning. People are always so surprised when I tell them#abt my wheel or say that I spin and it's in a good way but always with an undertone of 'oh but I could never'#You can!! It's easier than you think!! It might not be for everyone but it costs very little to try!!!
9 notes
·
View notes
Text
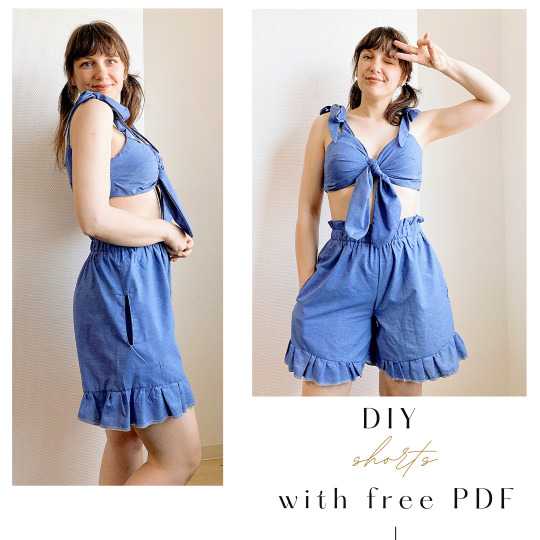
🌸 Sewing Enthusiasts, it's time for a fabulous summer project! 🌞✂️ Introducing our latest tutorial on creating the most adorable Ruffle Hem Shorts with an Elastic Waist – perfect for those sunny days and breezy nights! 🩳🌅
🎉 Join me as we embark on this fun and beginner-friendly journey of crafting these stylish and comfy shorts. With step-by-step video guidance, you'll master the art of sewing these paper bag shorts like a pro! 🎬🧵
🌟 And that's not all – I've got a special treat for you! 🎁🌈 In addition to the detailed tutorial, I'm offering FREE printable PDF patterns for these fabulous shorts in 5 different sizes. So whether you're petite or curvy, we've got you covered! 📏💕
Get ready to level up your sewing skills and enhance your summer wardrobe with this must-have garment. Show off your unique style with the perfect pair of handmade shorts! 🌺🌞
Join our creative community, hit that subscribe button, and don't miss out on the upcoming video where we'll sew an equally adorable matching top to complete the look! 🎀💖
Spread the word, like this post, and let your fellow sewing enthusiasts know about this exciting project. Together, let's create magic with our sewing machines! 🧵✨
Stay tuned and stay inspired, my lovely followers! Happy sewing and here's to a summer filled with fabulous fashion! 🌼🌻💃
youtube
#sewing#tutorial#diy fashion#refashion#easy sewing#pdf pattern#modern sewing#modern fashion#free sewing patterns#diy shorts#paperbag shorts#Youtube
13 notes
·
View notes
Text
Mastering CorelDRAW: A Beginner's Guide to Navigating the Basics
Are you a newcomer to the world of graphic design, tentatively dipping your toes into the vast expanse of CorelDRAW? If so, fear not, for you've stumbled upon just the right guide to set you on the path to proficiency. In this article, we'll embark on a journey through the fundamental features of CorelDRAW, ensuring that you not only understand the layout of the software but also gain insight into its essential functions.
Before we delve into the nitty-gritty, make sure to hit that subscribe button to stay updated with all the latest tutorials and tips. Now, let's dive straight into business.
Welcome to CorelDRAW! As you launch the software, the first thing that greets you is the user interface. Familiarizing yourself with this interface is key to navigating CorelDRAW efficiently. Let's break it down:
Menu Bar: This is your control center, housing various dropdown menus such as File, Edit, View, Layout, Object, Effect, Bitmap, Text, Table, Tools, Window, and Help.
Standard Bar: Next in line, the Standard Bar provides quick access to commonly used tools and functions.
Property Bar: Situated conveniently below the Standard Bar, the Property Bar displays contextual options and settings based on the selected tool or object.
Tools Bar: Located to the left of the workspace, the Tools Bar is where you'll find an array of tools for creating and editing your designs.
Status Bar: Lastly, at the bottom of the interface, the Status Bar offers valuable information and updates on your current workspace and tasks.
Now, let's shift our focus to the right side of the interface:
Color Palettes: Here lies a spectrum of colors, ready to breathe life into your creations.
Workspace: The blank canvas before you is your workspace, where imagination meets reality.
Now that we've acquainted ourselves with the layout, let's explore some essential functions:
File Menu: Starting with the basics, the File menu offers options such as New (Ctrl + N) for creating a new document. Customize your document settings, including page size, orientation, and color mode, to suit your project requirements.
Page Sizing and Resolution: Select from a range of standard page sizes or customize your dimensions. Ensure optimal resolution for high-quality output, typically set at 300 DPI (dots per inch).
Color Modes: Choose between CMYK and RGB color modes depending on your intended output, whether for print or digital media.
Orientation: Decide between landscape and portrait orientations to best showcase your designs.
Resolution: Maintain a high resolution (300 DPI) for crisp and clear images, especially for print projects.
By mastering these fundamental functions, you're well on your way to unleashing your creativity within the realm of CorelDRAW. Remember, practice makes perfect, so don't hesitate to experiment and explore the myriad possibilities that this powerful software offers.
Stay tuned for more tutorials and advanced tips to elevate your CorelDRAW skills to new heights. Until next time, happy designing!
🌸 Attention all creatives and designers! 🌸
Are you ready to take your designs to the next level? I've got something special just for you: a collection of over 1000+ beautifully crafted floral elements in CorelDRAW format, absolutely FREE! 🎨💐
Imagine the endless possibilities: use them to enhance your logos, create stunning graphics, or add a touch of elegance to your projects. These florals are versatile, customizable, and ready to elevate your designs to new heights.
But here's the catch: to get your hands on this exclusive collection, all you need to do is subscribe to my channel, give this post a like, and share it with your fellow designers. It's that simple!
Don't miss out on this incredible opportunity to supercharge your creativity. Subscribe, like, and share now to unlock your access to over 100 florals in CorelDRAW format. Let's blossom together! 🌼✨ #DesignInspiration #FreebieAlert #CreativeCommunity
Get over 1000+ beautifully crafted floral elements in CorelDRAW format, absolutely FREE!
2 notes
·
View notes
Text
Exploring the Sweet World of Caramel Fingerboards: A Beginner's Guide
Introduction
Are you ready to embark on an exciting journey into the world of fingerboarding? If you're new to this thrilling hobby, you're in for a sweet treat! In this beginner's guide, we will delve into the delightful universe of caramel fingerboards and everything you need to know to get started. From choosing the perfect fingerboard to mastering your skills on ramps and obstacles, we've got you covered. So, let's roll our sleeves up and explore the fascinating world of caramel fingerboarding!
What Are Caramel Fingerboards?
Before we get into the intricate details, let's begin with the fundamentals. Caramel fingerboards are miniature skateboards designed for finger use. They replicate the look and feel of full-sized skateboards, allowing enthusiasts to perform tricks and maneuvers using their fingers.
These tiny boards are crafted with precision, featuring realistic graphics, and they're perfect for honing your skateboarding skills without needing a skatepark. Caramel fingerboards are an excellent way to have fun indoors, improve your finger dexterity, and unleash your creativity.
Choosing the Right Fingerboard
Selecting the right caramel fingerboard is crucial to ensure an enjoyable and rewarding experience. Consider these aspects when deciding:
Fingerboard Decks
The deck is the heart of any fingerboard, and it's where you'll place your fingers for tricks and stunts. When choosing a deck, pay attention to its size, shape, and concave. A concave deck allows for better control and maneuverability.
Fingerboard Wheels
Wheels play a significant role in how your fingerboard performs. Consider the size, material, and hardness of the wheels. Softer wheels offer improved traction, whereas firmer wheels are well-suited for even and smooth surfaces.
Fingerboard Trucks
Trucks are the metal components that hold the wheels in place. Opt for trucks that are durable and offer a good balance between stability and maneuverability.
Fingerboard Ramps and Obstacles
To take your fingerboarding skills to the next level, you'll want to invest in ramps and obstacles. These accessories provide endless opportunities for creativity and challenge. Whether you're grinding a rail, sliding down a mini staircase, or launching off a ramp, fingerboard ramps and obstacles add excitement to your sessions.

Getting Started with Caramel Fingerboarding
Now that you have your caramel fingerboard and essential components, it's time to start practicing. Here is a detailed, step-by-step guide to help you begin:
Familiarize Yourself with Your Fingerboard: Spend some time getting to know your fingerboard. Experiment with finger placement and discover how it responds to different tricks.
Learn Basic Tricks: Start with the fundamentals, such as ollies and kickflips. These tricks will form the foundation of your fingerboarding skills.
Practice Regularly: Like any skill, fingerboarding improves with practice. Dedicate time each day to hone your skills and try new tricks.
Watch Tutorials: There are numerous tutorials available online that can help you learn new tricks and techniques. Learning from experienced fingerboarders can be incredibly beneficial.
Join the Fingerboarding Community: Connect with other fingerboard enthusiasts through online forums or social media groups. Sharing your progress and experiences with others can be motivating and fun.
Maintaining Your Caramel Fingerboard
To ensure your caramel fingerboard stays in tip-top shape, follow these maintenance tips:
Keep It Clean: Regularly wipe down your fingerboard to remove dirt and debris that can affect its performance.
Tighten Screws: Check and tighten the screws and nuts on your fingerboard regularly to prevent any loose components.
Replace Parts When Needed: If any parts, such as wheels or trucks, become damaged or worn out, don't hesitate to replace them to maintain optimal performance.
Store Properly: When not in use, store your fingerboard in a cool, dry place to prevent warping or damage.
Conclusion
In conclusion, exploring the sweet world of caramel fingerboards is an exciting journey filled with endless possibilities. Whether you're a beginner or an experienced fingerboarder, there's always something new to learn and master. Remember to choose the right fingerboard, invest in quality components, and practice regularly to unlock your full fingerboarding potential. So, grab your caramel fingerboard, hit the ramps, and let the good times roll!
#Fingerboard#Fingerboard Ramps#Fingerboard Obstacles#Fingerboard Decks#Fingerboard Wheels#Fingerboard Trucks
2 notes
·
View notes
Text
Understanding the World of Calligraphy in Los Angeles
Welcome to the captivating world of Calligraphers Los Angeles, where artistry and elegance intertwine to create stunning masterpieces. Whether you're a seasoned artist or just beginning your creative journey, exploring the realms of calligraphy can open up a whole new realm of artistic expression.
In this blog post, we'll delve into the enchanting universe of calligraphy and guide you on how to get started with this timeless art form in the vibrant city of Los Angeles. From understanding the different types of calligraphy to discovering where you can find classes, we've got you covered! So grab your inkwell and let's dive into the mesmerizing world of calligraphers in Los Angeles!
How to get started with Calligraphy in Los Angeles?
Getting started with calligraphy in Los Angeles is an exciting journey that allows you to explore the art of beautiful writing. To embark on this creative path, you'll need a few essential tools. invest in a high-quality calligraphy pen or brush. These can be found at specialized art supply stores or online.
Once you have your tool of choice, it's time to familiarize yourself with the basic strokes and techniques of calligraphy. Practice making thin upstrokes and thick down strokes to create contrast and variation in your lettering style. You can find helpful tutorials and resources online or consider attending workshops where experienced calligraphers share their expertise.
A critical aspect of developing your skills is patience and perseverance. Calligraphy takes time to master, so don't get discouraged if your first attempts aren't perfect. Set aside regular practice sessions, even just a few minutes each day, to refine your technique.
The Different Types of Calligraphy
Calligraphy is a beautiful art form that has been practiced for centuries. It involves the creation of visually stunning and elegant writing using various tools and techniques. In Los Angeles, there are several different types of calligraphy that you can explore to find your own unique style.
One popular type of calligraphy is Copperplate script, also known as English Roundhand. This style is characterized by its flowing lines and delicate curves, creating a graceful and sophisticated look. It requires precision and control when using pointed pen nibs to achieve its signature thin upstrokes and thick down strokes.
Where to Find Calligraphy Classes in Los Angeles
Finding calligraphy classes in Los Angeles is easier than ever before. With the growing popularity of this art form, there are several options available for those who want to learn and master the craft.
One of the best places to start your search is at local art supply stores or craft centers. These establishments often offer workshops and classes taught by experienced calligraphers. They may also have bulletin boards where you can find information about upcoming classes or events.
Discovering the world of calligraphy in Los Angeles offers endless opportunities for learning and creativity. Whether you're a beginner looking to dip your pen into ink for the first time or an experienced artist seeking new techniques, there are plenty of resources available throughout the city that will help you embark on your artistic journey! So what are you waiting for? Start exploring today and unlock the beauty of lettering with Calligraphers Los Angeles!
2 notes
·
View notes
Text
i'm the "artist" in the family (read: had an anime style drawing phase). we also started a tradition where the siblings handmake our cards and every year, we've had to step up our game. we used to rotate, but now it's my duty to make the cards while my sister gets the gifts. bro. we used all the good korean puns. now i'm looking up origami tutorials because i drew flowers for mother's day and i'm too lazy to craft a card window full of lego pieces. i made an ice americano shaped card for father's day because we got my dad a cold brewer.
2 notes
·
View notes
Text
Let's Celebrate 2023: Cricut New Year's Ideas & Crafts

Explore a festive array of Cricut New Year's ideas for 2023 with our curated collection. Whether you're crafting personalized Cricut New Year's Eve shirts, designing intricate Cricut New Year's cards, or seeking inspiration for memorable décor, we've got you covered. Dive into our assortment of easy-to-follow tutorials and templates perfect for welcoming the New Year with style. From elegant designs to playful motifs, discover how to create custom Cricut projects that capture the spirit of celebration.
Transform your festivities with Cricut's versatile tools and unleash your creativity with our step-by-step guides. Whether you're a seasoned crafter or a beginner, our Cricut New Year's ideas cater to every skill level. Elevate your party décor, surprise loved ones with heartfelt handmade cards, or craft unique apparel that shines during the countdown. Embrace the joy of crafting with Cricut this New Year and make every moment special with our inspiring ideas.
#customnewyearcardsonline#newyearcarddesign#newyearpostcarddesign#2022newyearshirtdesign#2023happynewyearlogo#2023logohappynewyear#2023newyeartshirtdesign#backgrounddesignhappynewyear#bestdesignsfornewyear#bestnewyearcarddesign#carddesignnewyear#designfor2022newyear#designhappynewyearcard#digitalnewyearcarddesigning#greetingcarddesignnewyear2023#happynewyear2021design#happynewyear2022carddesign#happynewyear2022logodesign#happynewyear2022posterdesign#happynewyear2023circledesign#happynewyear2023designfortshirt#happynewyear2023designtshirt#happynewyear2023frontdesign#happynewyear2023posterdesign#happynewyear2023tshirtdesign#happynewyearbestdesign#happynewyearflyerdesign#happynewyearlatestdesign#happynewyearmugdesign#happynewyearposterdesign
0 notes
Text
Authenticity in Each Bite at Our Restaurant
Introduction
Welcome to our cafe, wherever we pride ourselves on offering authentic flavors and a unforgettable dining expertise. We believe that each bite really should transport you to definitely the colourful streets of India, wherever the aroma of spices fills the air as well as the taste of traditional dishes lingers with your palate. By using a focus on sourcing new ingredients, celebrating Indian heritage, and crafting exceptional dishes, we try to provide the genuine essence of Indian Delicacies to Spokane Valley.
The Art of Indian Foodstuff Plating at Our Restaurant
Indian cuisine is known for its vibrant colors and beautiful presentation. At our restaurant, we acquire good pleasure within the art of meals plating. Every single dish is carefully organized to produce a feast with the eyes in addition to the taste buds. From intricate garnishes to creative usage of sauces, our cooks provide a contact of artistry to each plate.
Indian Spice Blends You might want to Try
Spices tend to be the backbone of Indian cooking, and our cafe isn't any exception. We've got curated an extensive selection of spice blends that showcase the numerous flavors of India. From fiery masalas to aromatic garam masalas, Every blend is created with treatment to boost the normal flavors of our dishes.
Exploring the World of Indian Condiments
Indian condiments are a crucial Component of any meal and add an additional layer of flavor to our dishes. From tangy chutneys to cooling raitas, these condiments are crafted utilizing classic recipes handed down as a result of generations. They complement our key classes and elevate the eating working experience.
How Our Indian Cafe Delivers Reliable Flavors to Spokane Valley
youtube
Bringing reliable flavors from India to Spokane Valley is not any uncomplicated task, but it surely's a person we get wonderful satisfaction in. We perform closely with neighborhood suppliers and import choose substances straight from India to make certain our dishes remain real to their roots. Our cooks have educated extensively from the art of plant-based Indian cuisine Indian cooking, letting them to recreate standard flavors with precision.
The Finest Indian Dishes for a light-weight Lunch
Looking for just a gratifying still light lunch option? Our cafe features A variety of dishes that happen to be great for a midday food. From flavorful salads to hearty soups, we have some thing to suit each and every palate. Take pleasure in the flavors of India devoid of experience weighed down.
Celebrating Indian Festivals with Food
In India, meals performs a central position in celebrations and festivals. At our cafe, we embrace this custom and offer you Specific menus for the duration of important Indian festivals. No matter whether It really is Diwali, Holi, or Eid, we Indian restaurant reviews produce a festive environment exactly where attendees can get pleasure from reliable dishes though immersing by themselves during the spirit with the Competition.
The Best Tutorial to Indian Fusion Cuisine
Indian fusion Delicacies is getting level of popularity around the globe, and our restaurant is within the forefront of the culinary motion. We blend standard Indian flavors with Worldwide ingredients and methods to build distinctive and remarkable dishes. From Indo-Chine
0 notes